Wednesday, May 31, 2017

Sale on all my Dolls on ETSY!!! HELP a family in need!

Delay in  Tutorial for an Important Message!

My tutorial is on hold while I help my friend and it should be up soon!

A lot is on my mind!!! Big Sale on my Dolls for a good cause!
No reasonable offer refused!

Attention all kind and caring peeps!

Please help me!!!! I have a very best friend in trouble back home. She is a Brittle Diabetic and is in renal failure…she cannot help earn the money anymore to help pay the bills, and is sick a lot. She goes and goes for those kids! They are not her Biological children. She, when she was healthier, took in this whole family of children to raise. I helped raise the youngest while he was ages 3- I2, until he could babysit himself…then he still stayed with me a lot.I am proud of them all and know each personally like a family member. I am already helping and want to raise some more money for them. Besides the rent there are all the expenses and deposits…etc. 

They have to leave their rental within 4 weeks, as it is being sold and there is not much time to find one at one they can afford... they are looking at everything in a very large area of Hillsborough Fl, where I am from. I am hunting for them on all the realty ads as she doesn’t have a computer. There are 5 children to find a home for and make sure they have enough deposit.


I am not asking something for nothing...I will sell any doll in my store at a best offer and I will not refuse any reasonable offer....so for all those dolls that have maybe been a little high priced....here's your chance! All money's go to finding them a house...4 boys and one girl and Kippy! All good students and well deserving and a woman with the biggest heart I have ever seen…so please…come buy my dolls at my Etsy Store:


BoggyBottomBayou


https://www.etsy.com/shop/BoggyBottomBayou


Please message me on FB or here and let me know what doll and what offer you would like to make plus shipping to keep the doll. First come 1st serve!👻

https://www.etsy.com/shop/BoggyBottomBayou.com or just go to ETSY and enter boggybottombayou


Thank you for your patience!!!!

My Best Always,

Carly

Sunday, May 21, 2017

A Preveiw of the Joint...Joint Anatomy


The Anatomy of a Joint

Please bear with me...I'm running behind as I am still in rehab for losing my hip.  But I am walking on a rolling walker with no left hip(ball and socket are gone)  I am blessed, but slow due to my schedule of rehab and work.  I promise to show the ins and outs of putting joints in for limbs and turning of heads.


Here I have everything I need to joint a doll limb (a head is different!)


Above is a model of how the joint is put together.  Here you can see the order of the first few steps.

1) place the tap bolt through the washer

2) With the washer, thread the tap bolt through the fiberboard disc.

3) This then goes inside the arm or leg and through a hole marked on the leg.  Now it looks like this:


This is a view between the limb and the body.  This is how the joint connects the two.  Is this making sense?


Now, this is the other side where the bolt has come through both layers of fabric. 

1) Place the 2nd disc on the bolt

2) Follow by putting the washer on next.

3)  The nut drivers go on either side, one on the bolt head, and the other on the  Lock nut.  Lock nuts stay tight and do not back off of the bolt over time.

I hope this makes sense. I am hoping that my son can video me actually putting a joint together on the doll.

Next time we will start putting the joints on the doll we have been working on...This page is more of a study guide for the order of assembly.

Next...Surprise!  Here it is:


Do you remember the front hair line?


I took my smallest felting needle and needle felted this shape from the yarn on her forehead!


And here she is with her widow's peak!

Till next time!

Carly

Wednesday, May 17, 2017

Commercial Break! Teddy Bear looks for Loving Home!


Sweet Emma, Looking for a Home


Emma wants to find a loving home with someone. Standing 12" to the top of her hat, she is crafted from genuine smooth coat Schulte mohair.Shes has hand-blown German glass eyes.  Paw pads are distressed and ears and muzzle too! If she could walk she would crawl on her lightly distressed Merino wool-felt paw pads to come greet you!
Her re -homing fee is $125+ $15 Shipping. Please message me if you're interested in taking her home


Thank you for being here,

Carly

Monday, May 15, 2017

PLEASE try commenting again...I've tried to fix things...let me know on FB please!


If you have or had had any trouble posting comments, please le me know on FB at

https://www.facebook.com/carly.smith.7161953


Frustration!

Love,

Carly

Sunday, May 14, 2017

Making the Body/Jointing a Soft Doll


This going to be FUN!

Knowledge of sewing a doll body and a doll pattern that you can alter to a rounded top of the legs and
arms as seen in the pictures.  The limbs will open high on the sides to allow entry of the joint complex.  


Make your doll body and legs.  Mine is already tea stained and I won't be "grunging" her up other than that, but you may stain however you like!


I call the bag in the foreground an "body bag" and it is filled with several ounces of BB's (never use Iron shot as it could be ingested and damage a child who gets hold of it and pops it into their mouth).  Yep, you can take the Nurse out of the hospital, but you can't take the nurse out of me!  


Here is what you need for jointing with the Lock Nut1)

1) 1/4" Nut driver

2) 5/16 nutdriver

3) an Ice Pick     

4)  10 fiberboard discs with 1/8 inch center hole.  
One disc is already in the bottom of her head and 
tightened around with a gather stitch.

5) 10 washers with a 1/8 inch hole.

6)  5 Lock-nuts
Take the head disc that the washer and bolt need to be stuck with Epoxy glue.
( I will will talk  more in the future about how to do this).


Tie off your threads as tight as you can or get someone to help hold it while you make the knot.


Clip your strings.


See the rounded thigh and shoulders?  Very necessary!!! 


Now make sure all limbs are turned and use something like the end of a paint brush to make sure the seams are not folded.


OUCH!


The hole should look like this.


Slide the disc with the washer and bolt and insert the disc into the opening in the side of the limb.
Fiddle gently with the bolt to get the nail to go through the hole.


Continue until all four limbs have their hardware in place.  You are finished for today!

Please leave a comment so I can see if my IT fixed the problem of peeps not being able to leave comments.


See you next time with more on jointing!

My Best Always

Carly


Friday, May 12, 2017

SPECIAL ATTENTION PLEASE!!! Regarding "Comment" section! Getting it FIXED

Just a quick note from me that my blog doesn't seem to be accepting peep's comments and I am so sorry, but I just found out and have notified my IT woman and she is pretty quick!  A friend just told me she tied and it did not work!

My Apologies,

Carly

Thursday, May 11, 2017

Let's Get Some Hair on this Baby! Tutorial continued.....helpful to have experience with felting hair

Let's Get Some Hair on this Baby!

Lets talk a sec about this tool:


It is a 4-needle felt punch and great for felting hair and especially 
for mohair and natural yarns (at least part wool).  Large knobby end is easy on the hands.  Going to teach my best friend how to felt with it because she has arthritis.  So it is a good and handy little machine


You can go much faster with the easy punch style felter .Just hold the head firmly and watch your fingers!  This thing can be mean!...I think I bought this one at Walmart...go felters!


Just wanted to show you the first color I tried...curly gray just didn't hit me! LOL!

  How it needs to be held. nice even deep strokes or punches...check to make sure your wool is burrowing into the stuffing of the head or it won;t be secure.


Shows the brow line and sides...you may do it in any order you like with whatever hair you like.


 Getting ready to put some around back...


Just continue filling and felting the whole head to your hearts content!


Keep going!  Not to shabby!


Next time we will start on the body!

Hugs, 

Carly

Tuesday, May 9, 2017

Art Doll Quarterly Witch for Sale by Carly Smith of Boggy Bottom Bayou on Ebay 9pm tonight!


I will come back to the tutorial shortly. I am introducing my Art Dolls from Art Doll Quarterly I hadso much fun creating them!  Then I just couldn’t let go of them until I was well.  (Had a long bout
with a broken leg, much better now).They are not jointed like my other dollies, but I think you will like them.  I feel they are chock-full of Whimsy! This is just one of them…more to come.  All will be one of a kind and come signed by me.


Estella is part paper Mache and part soft sculpture doll.  She stands 30-inches with her hat on (one of my larger witches) and about 20-inches when sitting. Her body is made of muslin that has been stuffed and weighted for sitting. Estella’s arms and legs are detailed in acrylic paint and lightly wired for posing and holding very light objects. Her legs can also be positioned to sit in different ways.   She also displays very well standing with the use of a doll stand. Sometimes, after shipping, the weight bag inside her, shifts a little, and one may have to set the doll down with a little “thump” or “bump” to their bottom in order to re position the weights.


Estella’s hat is made of coco brown felt topped with a large hand blown glass, lamp work  jack-0- lantern.  Coordinating bodice and sleeves are made of a 100% cotton fabric with a whimsical, Halloween Harlequin, print and accented with an elaborate lapel in a decorative plaid that is elaborately embellished with skull beads, ribbon, and lace. Her collar is made with five layers of different cotton Halloween prints that echo the colors in her stylish outfit. Sparkling crystals are and added dazzle, applied one by one on much of her lace trim.


Estella’s skirt is a display of colorful print and colorful scenic stripes.  Her overskirt is of brown and lime lace with ribbon ruffled lace with little bat “garters” near her knees. .  Her skinny little boots are topped with crystal edged lime trim and adorned silver jewelry findings with jade colored glass crystals.  She holds her bucket full of Candy corn.  It is decorated with colorful Halloween trim and most importantly her little, candy corn, hand sculpted friend, Grinz! 


Estella is not a toy, but a collectors doll and should not be purchased for children.


The Auction is at 9p.m.  See you on Ebay!


My Best Always,

Carly


Sunday, May 7, 2017

WIP Goo Goo Eyed Dollies


WIP Goo Goo Eyed Dollies  

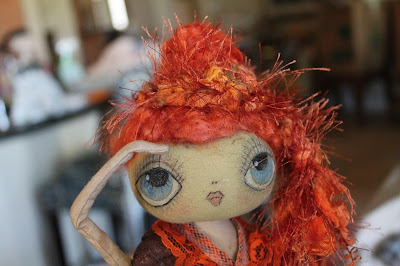
Here is little progress on my little red headed doll.  This is her final hair...I love the funky yarn blended into her "Do".


Still need to paint her chest and arms...She is a little kinda Halloween Fairy, if I can find the right wings for her.  They need to be about 8 inches long.  Let me know if you know a good source!


The cute little girly thing is probably backlash from always doing ugly witches!  LOL!


I love the way the base of this real pumpkin stem is large ,tapering to a little, twisted top!


See the screw at the bottom of her head?  Her head, arms and legs 
will all be jointed like a teddy bear.


See you at the next post!
Carly

Saturday, May 6, 2017

Facial Markings and Eyelids


Facial Markings and Eyelids

This is how you get the size for the eyelids. Mark around the eye  about an eighth of an inch.  Cut out and use as a template for your eyelids.  


Make two, of course, out of your tea-stained muslin. 
Fold and crease them in half.


Pin the eyelids, overlapping about half the glass pupil (this is a 12 mm eye. At this
time begin placement of the mouth. Bend the twisted, rusty wire into a mouth of your choice.


This face is turning into something!!!


Select DMC thread # 3371 (very dark brown)


Stitch your eyelids on with short, neat stitches I think it is called a whip stitch. 
Then hide the knots under the eyelid


More stitching


Anybody wonder why there is a screw sticking out of the bottom, center of this head???
This doll will be 5-way jointed, including the neck.  I think that jointing a doll is 
going to be its own tutorial. As it is a little complicated. 


That's all for now!

Please leave comments and questions..


Hugs

 Carly