
Pumpkin Tutorial
Welcome!
Why am I writing about how to embellish a ordinary fabric pumpkin? Easy! To turn it into an "extra"ordinary pumpkin! Also, every technique you will apply to the pumpkin, can be applied to the embellishment of your Art Dolls, including lace covered fabric, glittered fabric and leaves or other items, and more. By the end of this tutorial, you will be able to make your own embellished pumpkin and have fun learning techniques you can apply to your doll and accessory designing skills!

 |
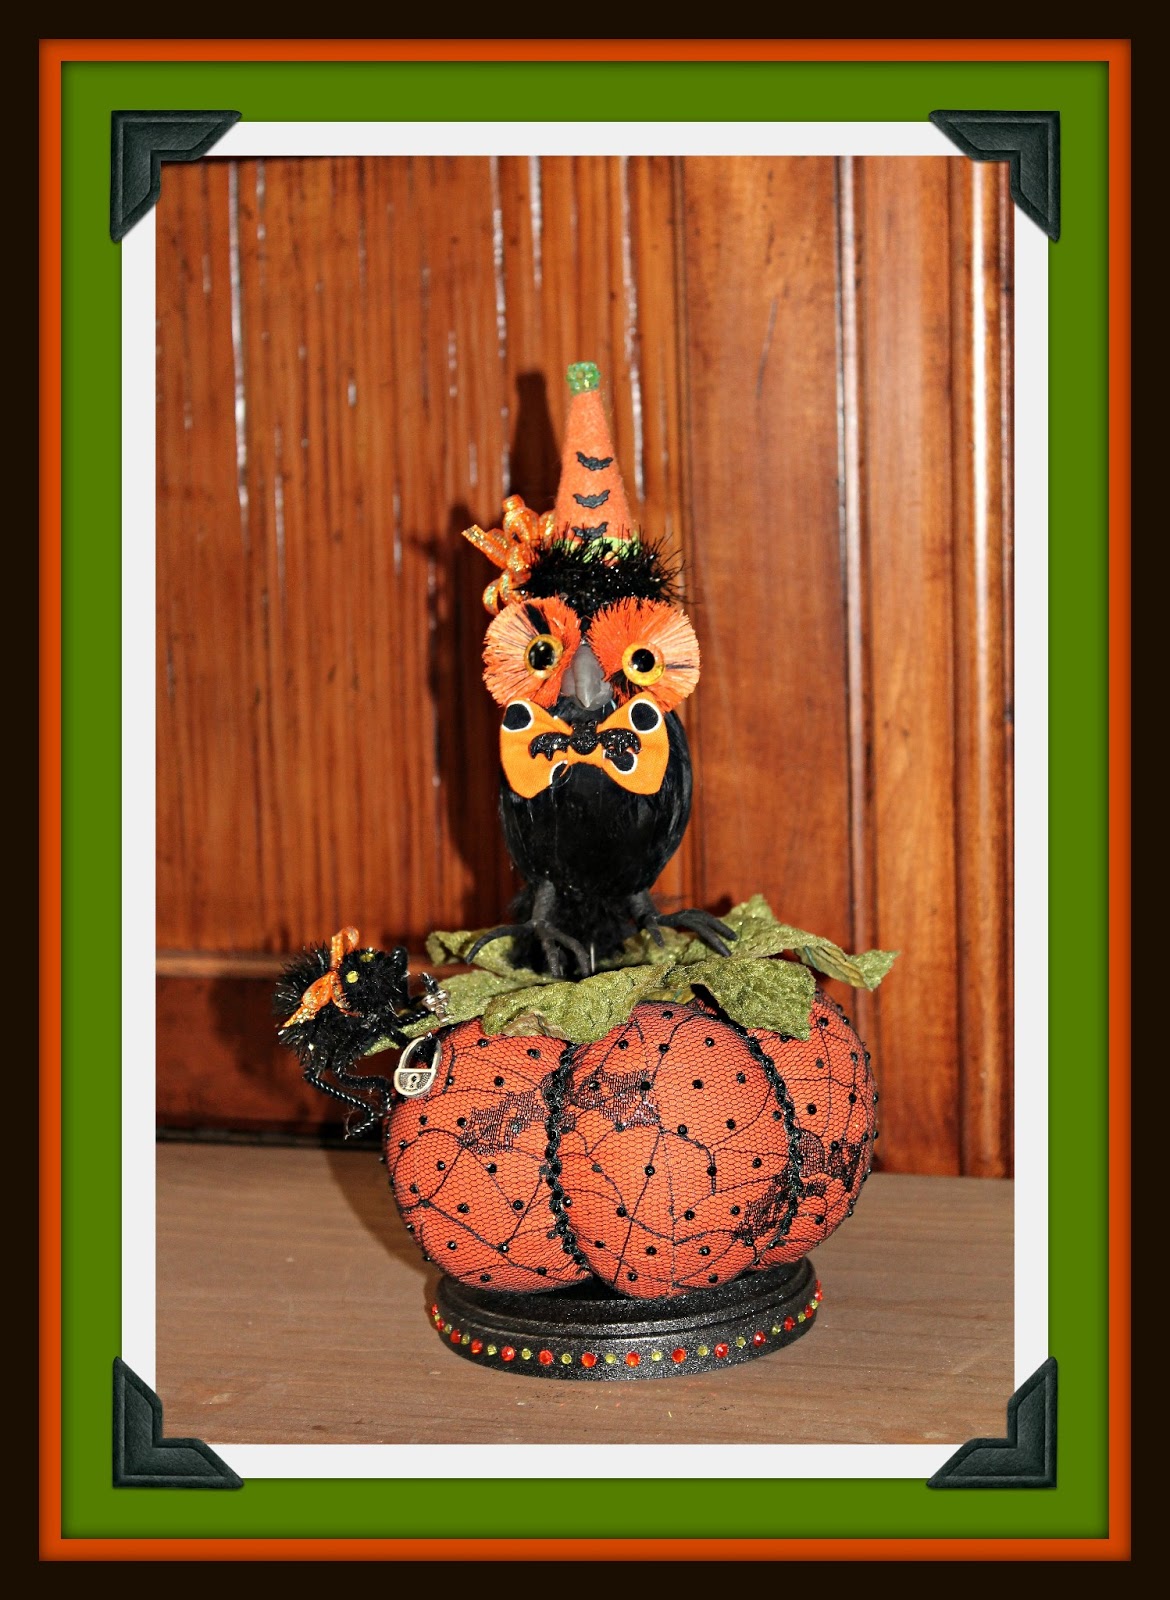
| Embellished Pumpkin |
Spin off on this pumpkin and make a plain orange pumpkin, then embellish with crystal swirls like the ones featured in shops and magazines for $50.00 a piece! Make three pumpkins in varying sizes and embellishments for the beginning of a wonderful fall display
Just a note to my very Prim Friends and Prim Artists...This pumpkin would also do well made out of muslin, then painted and stained with tea stain coffee stain and "grubbied up" instead of all the "bling". I've done many pumpkins in the past that way and was very pleased with results (Pic A). This pumpkin was painted in acrylics, sanded, and then stained for a very primitive look.
 |
| pic A This Pumpkin in (pic B) is large enough for me to sit one of my bears on back when I was a Teddy Bear Artist( I guess I still am...but bears cost so mush to make). The only difference is that it uses a larger wedge pattern and more wedges. More wedges make for a slightly flatter pumpkin and therefore will balance larger dolls or, in this case, bears. This bear's name is Smudge and he is still one of my favorites! |

pic B
The pumpkin you will make from this tutorial, is very much like the one you have seen in this
year’s Art Doll Quarterly Fall 2013. Just look at my Bird Cage Doll, Marguerite, below (pic 2) ,
 |
| pic 1 |
 |
| pic 2 |
Before beginning, you may want to review the article in Art Doll Quarterly to better prepare yourself for the techniques you will be using in this tutorial. The Fall 2013 issue is available from the publisher at Stampington, Barnes and Noble and various other fine book stores and craft stores.
Click arrow above for Video
Tools and Materials

(some knowledge of general sewing techniques is required)
- Scissors
- Hot glue gun
- Hot fix crystal applicator (Mine is Made by Darice - see links)
- Cotton print fabric at least 26 inches by 24 inches (see links)
- Black lace fabric about 2 inches by 2 inches (see links)
- Mastex thread (available through Edinburgh Imports-see links)
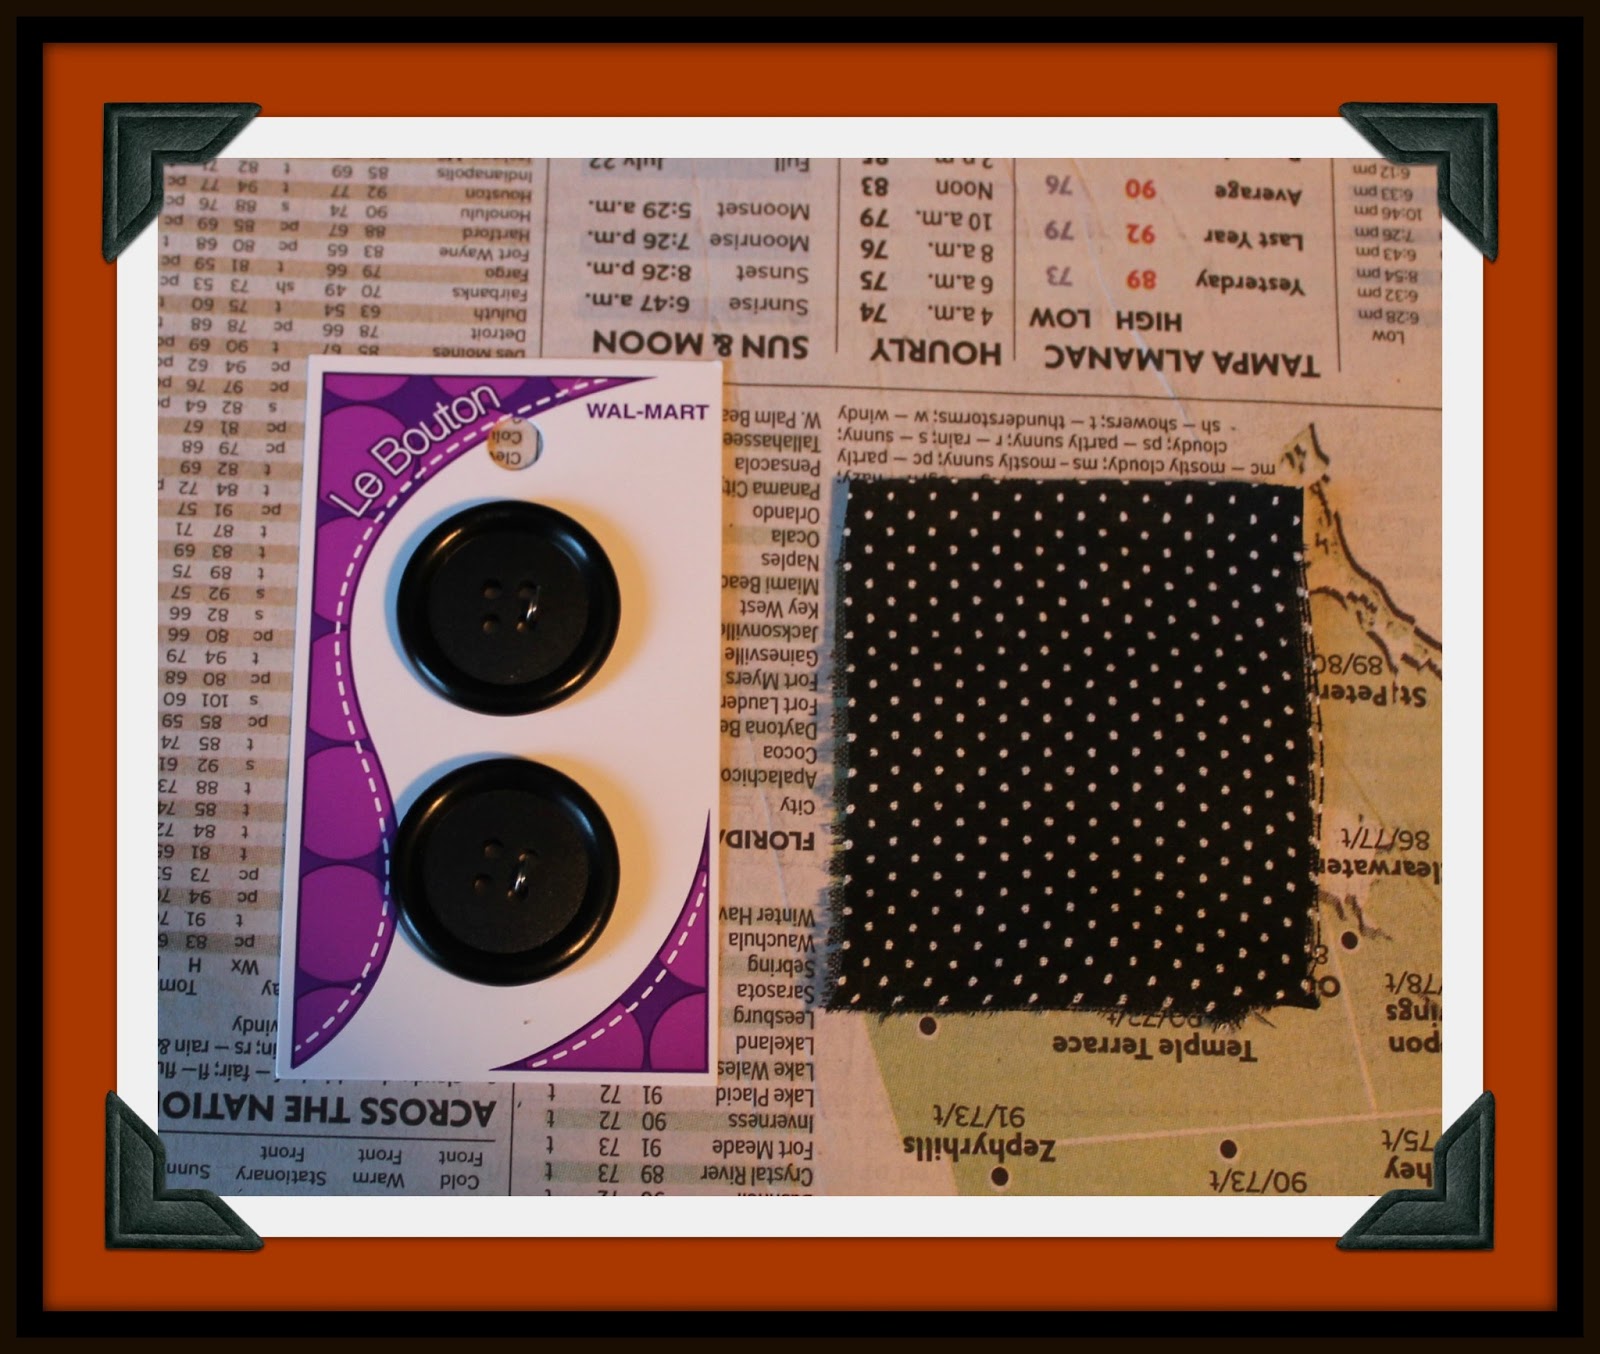
- Two approximately 1" sturdy buttons JoAnn's or Walmart)
- One 5" sculpting needle
- One package of 7 mm rick rack in black
- Size 16ss olive or black hot fix crystals (see links)
- Elmer's Spray Adhesive
- Hot Glue sticks
- Five green Millinery leaves approximately 3 inches long by 2 inches wide
- Lime green ultra fine glitter (available at many craft stores)
- Polyfil stuffing
- One 4 inch beveled wood base (bought mine at JoAnn's but not online)
- Black acrylic craft paint
- Paint brush
- Matte Interior Varnish by Delta Ceramcoat
- Glamour Dust (glitter paint) Black Ice by DecoArt, sent to me by my swap box pal, and found at Micheal's
- Sewing Machine
- Fabri-tac fabric glue
- Large Books (to hold weight in place Step 20)
·
Stampington http://stampington.com/whats-new/whats-new-coming-soon/Art-Doll- Quarterly-Autumn-2013 request your magazine today!
Fabric http://www.joann.com/ for other Halloween fabric of your choice
Fabric http://www.joann.com/halloween-spooky-prints-fabric-black-dot-on- orange/zprd_11668480a/ for the fabric I used on the pumpkin
Lace http://www.joann.com/search/_black%20lace%20bats/ for the lace I used on the pumpkin
Crystals http://www.ebay.com/itm/1440-10G-16SS-4mm-RHINESTONES-HOT-FIX-IRON-ON-OLIVE-FLATBACK-GLASS-/261180241788?pt=LH_DefaultDomain_0&hash=item3ccf8e377c very important how you order these and make sure they are not from overseas! I learned the hard way that things coming from China are on a very slow boat!
Crystal Heat Applicator http://www.ebay.com/itm/Darice-Rhinestone-Setter-Hot-Fix-Applicator-with-7-Different-Tips-/231016232719?pt=LH_DefaultDomain_0&hash=item35c9a3f70f
MastexThread main_page=advanced_search_result&search_in_description=1&keyword=mastex&inc_subcat=0& sort=20a&page=2 Very strong thread that is great for sculpting!
Millinery Leaves http://www.ebay.com/itm/Vintage-Millinery-Flower-Large-Velvet-Leaves-Y19-Green-/390036875980?pt=LH_DefaultDomain_0&hash=item5ad0026acc be sure to get leaves that come with a wire down the middle and protrudes out from the leaf stem about 2.5 to 3 inches. Holding the wire while you glitter is very helpful! I prefer velvet leaves.
·
Pattern

Pattern

Several Examples of Lace Covered Cotton Print
 |
| 3-A |
 |
| 3-B |
 |
| 3-C |
Here We Go!
Step 1- Choose a
piece of fabric and a piece of lace. For
teaching purposes, I have chosen an orange with black dots cotton print fabric
and a fairly open, bat-patterned lace.
(found at JoAnn’s online, see useful links section)
 |
| pic 4 |
Step 2- Fuse the lace fabric to the cotton fabric. This is done by spreading out your 26 inch wide by 24 inch high, cotton fabric, face up, and smooth (iron if needed). Then take a piece of your lace, the same size or a little larger and have it ready to lay over the dotted fabric. Be sure to protect work surfaces with newspaper or plastic (pic 4).
Now, take your Elmer’s Spray Adhesive and spray lightly over the cotton piece. Immediately, but without hurrying, place your lace, face up over the cotton and smooth it from the center, outwards. You may lift slightly and adjust the lace until it lies flat. A ruler may help with smoothing the fabrics better than your hand.
You now have a two layer, custom, fabric with which to make your pumpkin! See how the cotton pattern peeks out between the lace pattern?... Let it dry several hours. You have just embellished your cotton with lace…the same way I did Marguerite’s bodice!
Label one end the "Top" and one end thee "Bottom". Pin so that all the tops are facing the same direction.
 |
| pic-5 |
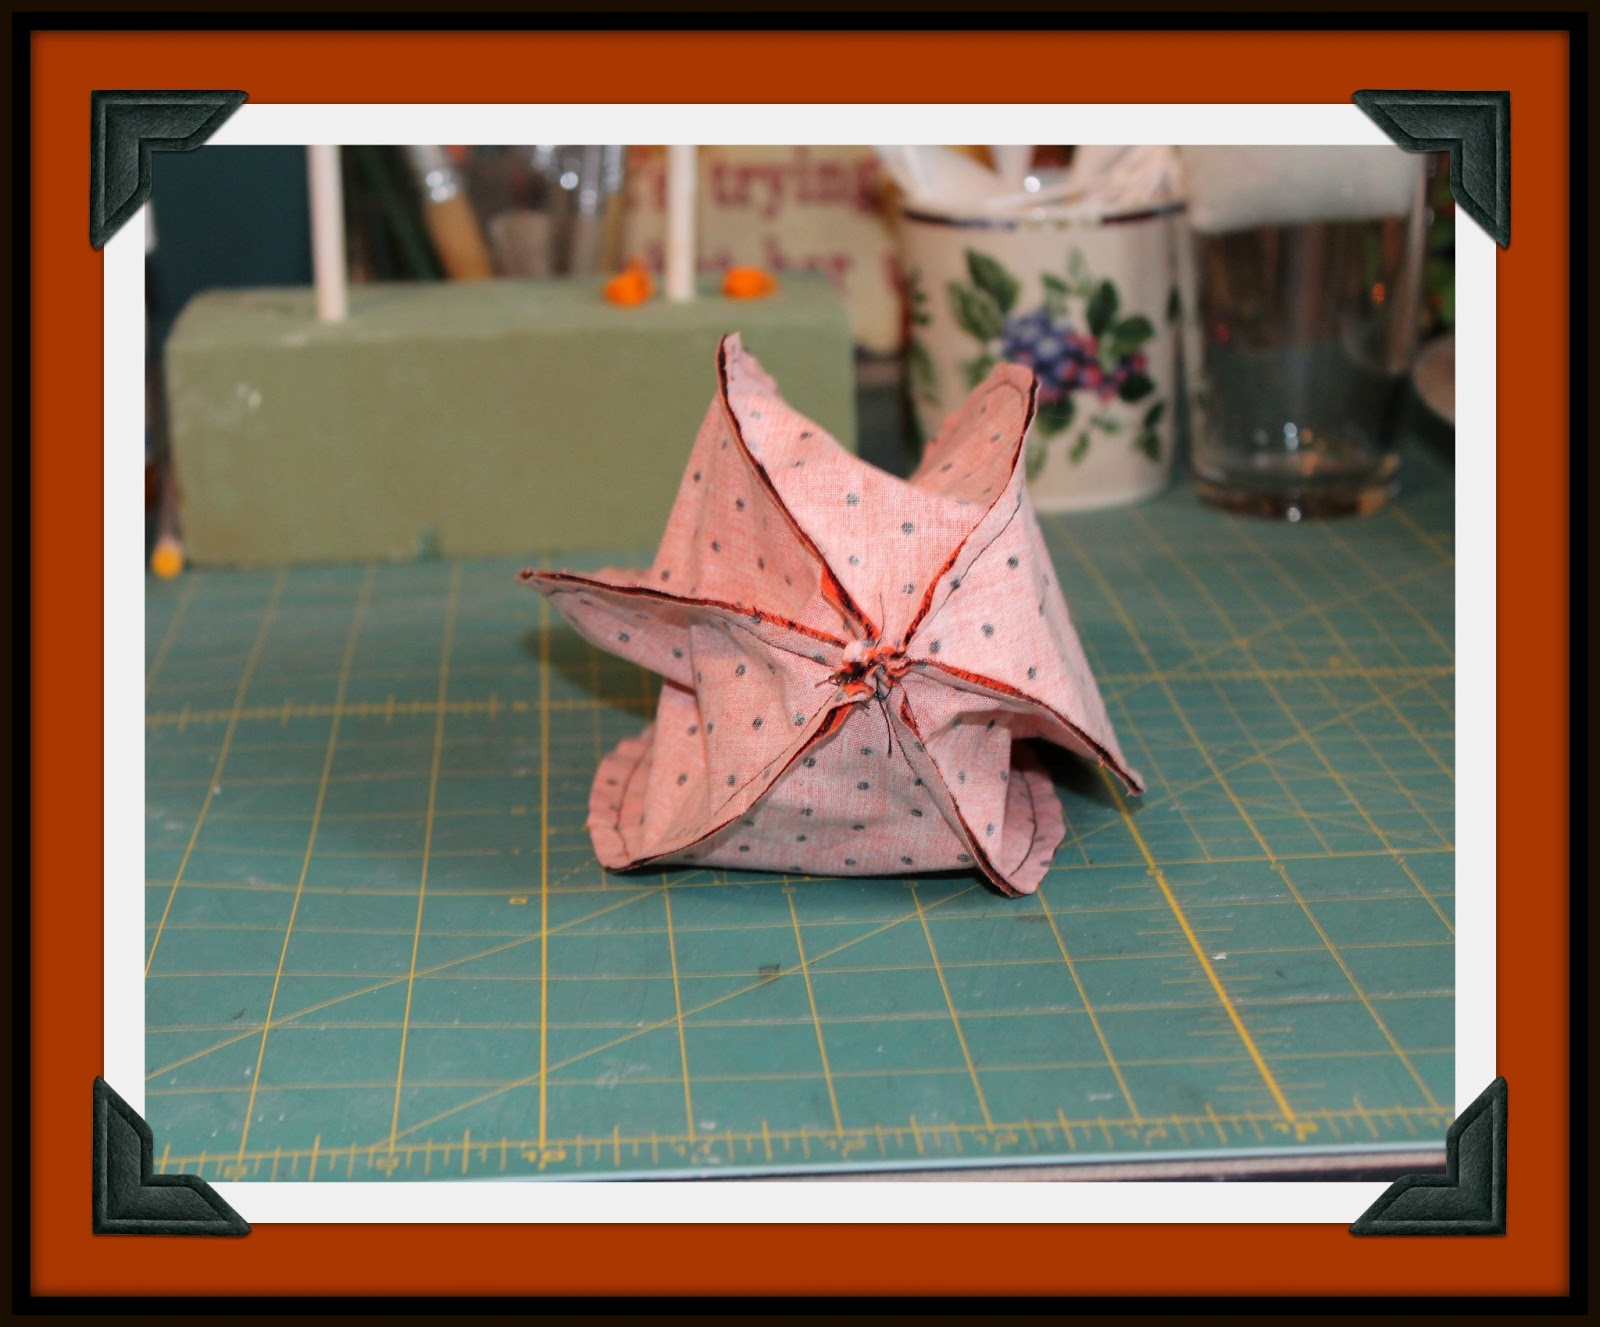
Step 4 - Now sew the wedges together (right sides facing each other) two at a time until you have 3 wedge pairs (pics 6&7).
 |
| pic-6 |
You are going to sew the pairs together until all three of the pairs are connected (pics 7, 8 & 9). Be sure to keep the top of the wedges together or your pumpkin may become lopsided!
 |
| pic-7 |
 |
| pic-8 |
 |
| pic 9 |
Make sure to leave 1/2 inch open seam at the bottom of each pair and at the bottom when sewing pairs together. You will use this opening to turn your pumpkin right-side out, so don't let it get too small. Now, stuff your pumpkin firmly, but not too tight, with the Polyfil (pic 10).
 |
| pic 10 |
Step 5 - Using the five inch sculpting needle, attach one of your large buttons, using the mastec thread. (I double-thread my needle, even with this strong Mastex)Then begin to sculpt each wedge in half (pic 11 & 12) When bringing the needle up through the middle of the pumpkin, exit just outside the button's edge, but do not come through the buttonholes. The thread...visible here ( pic 11), will not show on your finished pumpkin.
 |
| pic 11 |
Pull tightly to crease the wedge and then wrap thread around the button several times to hold it tightly. Go back down through the pumpkin and knot thread to bottom securely (pic 12). Repeat sculpting for each of the six wedges. I usually re-thread for each wedge
 |
| pic 12-A |
 |
| pic 12-B The picture above shows how the top of your pumpkin should look after sculpting (pic 12-B). |
The picture below shows the bottom of the pumpkin as it should look when sculpting is finished (pic 12-C).
 |
| pic 12-C OOPS! My little ghouls look as if they are thinking they want some Pumpkin Pie! |

pic 13
Step 6 - The next step is pretty easy. Make sure you have practiced a little with your crystal applicator beforehand as sometimes it can be a little tricky. Be sure you have the correct tip in place, a size 16ss, to match the size of the crystal. Heat the gun and apply the crystals to the rick rack as shown (pic 13).
I place the crystals along the rick rack in a zigzag pattern that corresponds to the pattern of the rick rack (pic 13-B). If a crystal won't detach properly from the applicator, keep it in position and gently poke a straight pin down the slot above the crystal. Put a little downward pressure on the crystal with the pin, holding it in place, while carefully lifting the applicator off the crystal .
 |
| pic 14 |

pic 15
Step 7 -You are ready to attach the rick rack to the pumpkin! Beginning at the bottom of the pumpkin, hot glue the rick rack over the needle sculpting that you did in step 5. This will completely cover the sculpting thread (pic 16). Continue up the pumpkin a little bit at the time until you reach the edge of the button. Going slowly helps to keep you from making mistakes like getting the glue on your new lace fabric. I use a maneuverable mini glue as it is much easier to control.
 |
| pic 16 |
Your creation is really beginning to look like a tuffet!!! (pic 17)
 |
| pic 17 |
Step 8 Ready to "BLING" again? Some of you may have you may have noticed...I'm always ready for that! So, prepare and protect your work surface, get out your glitter, spray adhesive, and Millinery leaves and let's get ready to "blow" glitter.
Please see Art Doll Quarterly's article on "The Bling Factor" due out August 1, 2013. There, inside, are complete instructions on "blow" glitter. It is available from my publisher, Stampington, and also Barnes and Noble book stores. I'm sure it is also available at many other fine bookstores and craft supply stores See Useful Links).
 |
| pic 18 |
Step 9 Great Job! Your leaves are glittered! Good Job! After your leaves dry, take a leaf and press it up next to the button on top of the pumpkin. Wrap the wire around the button, being careful to tuck it under the button and out of sight as you go around it (pic 19).
 |
| pic 19 |
 |
| pic 20 |
Gently coax the leaves into position, bending some tips up and some tips down for a life-like appearance. This is know in the floral world as "re-flexing"(pic 21)
 |
| pic 21 |
Now, stand back and admire your pumpkin and what you've done so far! You are almost finished! All there is left to do is to cover the button and make the base!
Step 11- Take your second button and trace it's outline on the wrong side of the 2 x 2 pin dot fabric. Cut the circle out, leaving approximately 1/4 - 3/8 inch around the circle you have traced (like a seam allowance) pic 22 -25.
 |
| pic 22 |
 |
| pic 23 |
 |
| pic 24 |
 |
| pic 25 |
 |
| pic 26 |
Step 13 Snip the fabric around the button to the edge of the button...each flap should be about 1/4 inch apart. Encircle the button with a thin line of hot glue. As you go around the button, press the cut edges snugly against the edge of the button (pic 27 and 28).
 |
| pic 27 |
 |
| pic 28 |
 |
| pic 29 |
Step 14 Hot glue the fabric covered button directly over top of the exposed button, being careful not to get glue on the pumpkin (pic 30 and 31).
 |
| pic 30 |
 |
| pic 31 |
Wow! You are almost finished!!! All you have to do is make a base and your Halloween Doll will have a Pumpkin Tuffet to sit on!
Step 15 Gather the supplies to paint the wooden base. Paint it with 2 coats of black acrylic craft paint allowing it to dry between coats (pic 32 and 33).
Step 15 Gather the supplies to paint the wooden base. Paint it with 2 coats of black acrylic craft paint allowing it to dry between coats (pic 32 and 33).
 |
| pic 32 When I am working with just a little bit of paint, it is not unusual for me to squeeze a little onto my wax paper and wet my brush from there. When you have finished your first coat, remove the newspaper and allow your base to dry on wax paper...otherwise, the newspaper will stick to the edge of the base |
 |
| pic 33 |
 |
| pic 34 |
 |
| pic 35 |
Step 17 Varnish your base with one coat of the Matte Interior Varnish by Delta Ceramcoat. Let it dry for a few hours (pic 34) Allow to dry on wax paper.
 |
| pic 36 |
 |
| pic 37 |
Time to Really Bling!
One key factor in crystaling, in order to stay organized, is to find the right organizer. This one shown (pics 38 and 39), was found at Walmart. For me it is the best I've found if you plan to crystal quite often. The sections just unscrew for ease of removal and you only need to have out the colors you need at the time.
 |
| pic 38 |
 |
| pic 39 |
 |
| pic 40 |
 |
| pic 41 |
Last Step! You're almost there!
*need pics and text of gluing
Step 20 Got your books ready??? You are going to need them! (pic 42)

Turn your pumpkin over and apply the Fabri-tac to it's underside (pic 43).
 |
| pic 43 |
Then, being careful not to drip glue, turn it over and center it over the base. I just set it down in the spot I think will center it. If the glue is applied as shown, small adjustments can be made once it is placed...turn the pumpkin and base around slowly, check to make sure it is centered all around and does not overlap the base anywhere (pic 44).
 |
| pic 44 |
Keeping it in place, gently press it down as you place your books on top of the leaves and add the weight. Yes, it will look silly for a day....(pic 45)
 |
| pic 45 |
But, just wait 'till you remove the books!!! All you have to do is adjust your leaves one last time...
Now, your embellished Pumpkin is finished!
Please go and take some pictures of your pumpkin and send them to me for publishing here on my blog!!!
 |
| Ta Da! The Finished Product! |
| Copyright 2013 C.R. Smith
This document is the property of C.R. Smith and any reproduction in whole or in part is strictly prohibited. This document is intended for personal use, with the emphasis on recreational crafting, and private craft shows. The use of this document and the contents thereof is not permitted in such a way that it may be used by any persons for commercial use or sale, without the expressed written consent of Carolyn Rene Smith. By using this document, you agree and adhere to the preceding terms, and any violation thereof is subject to penalty by law..
|
This is an excellent tutorial. I see many opportunities to use this information in creating pumpkins for use in many different ways! Thank you ~ Joyce
ReplyDeleteWell, thank you so very much Joyce! I hope I get to see some of your new pumpkins! You sound very creative!
DeleteXO,
Carly Anne
I enjoyed this very much. At the pace in which I work, it's going to take me 10 years to finish one pumpkin, but I enjoyed the tutorial nonetheless.
ReplyDeleteSo glad you enjoyed the tutorial! It will always be available on my blog. I may make a whole section devoted to tutorials...maybe that will make it possible for you to indulge yourself in your creativity.Sincerely,
DeleteXO,
Carly Anne
Great tutorial Miss Carly! You sew the pumpkin for me and I'll do the rest!!
ReplyDeleteHello there, Dear One! I just may do that...then you'd have to try your crystal applicator! LOL! Thanks for stopping by!
DeleteX),
Carly Anne
Thanks for sharing this is awesome!
ReplyDeleteLady Jane, Just hearing that is such a reward...Thank you so very much!
ReplyDeleteLove Always,
Carly Anne
Following your blog and so happy to be in the contest. Thanks, Pam It's midnight here in Florida. Stayed up to enter. Thanks, Pam
ReplyDeletematdog@bellsouth.net